Showing posts with label Fotografi. Show all posts

Tuesday, October 21, 2014

3 major components making up exposure: shutter speed, aperture, and ISO

The camera is basically a useful tool for capturing the light through the camera sensor. Light entering the sensor eventually translated into an image. If the light received by the camera is less, the image will be darker (Under Exposed). Conversely, when light entering into the camera excessive, the picture will be too bright (Over Exposed).
Exposure is the amount of light that enters and is received by the sensor in our camera in a photo shoot, of course, need the right camera settings to create an image with good exposure, unfortunately most people after buying a digital camera fixed on the auto mode. Instant auto mode is the most easy and rapid to use because we do not have to bother setting the camera, but this does not give you the satisfaction of creativity.

For those who want to "Move Up" out of the auto mode and want to channel the creative spirit into the photographs produced, it helps us understand the concept of exposure.


decreased, standart and increased exposure


A famous photographer Bryan Peterson has written a book titled Understanding Exposure which also explained the concept of exposure is easy. Peterson members illustration of three elements that must be known to understand the exposure, he was named the relationships between the three as a triangle Photography. Each element in the photographic triangle is associated with light, how light enters and interacts with the camera.

These three elements are:


  1. ISO - the measure of how sensitive the camera sensor to light 
  2. Aperture - how big open lens when the photo was taken 
  3. Shutter Speed ​​- the span of the 'window' in front of the camera sensor is open

the exposure triangle
The interaction of these three elements is called exposure. A change in one element will result in a change in the other elements. So, to make a photograph with a good exposure, you need to create a composition which is also good, especially the composition of the three elements above (ISO, Aperture, Shutterspeed).


Sunday, October 19, 2014

Panning Technique

jogja cornering, panning teqnique f/5.6, exposure time 1/50 sec, iso 200

Panning is a photography technique for shooting a moving object by means of moving towards the camera in the direction of movement of the object to be photographed so getting photos of moving objects sharp and bakground are blured. This technique can be used to photograph vehicles that are running, a bird in flight. etc. Although it seems trivial, but you need to practice to get good photos of moving objects, you should be able to move the camera in rhythm with the movement of a moving object.


Panning foto Exposure Time 1/20, Iso speed 100, F/5
location: std Maguwoharjo, Sleman, Yogyakarta


panning (photo the move object)

So how good panning photo that moving objects look sharp?

    1. Set your camera to Shutter Priority mode (TV) 
    2. Manual focus mode, the focus setting is continuous (AF-C or AF servo) so that the object is always locked with a sweet and tangy though the distance between the camera and the object changed  
    3. Set the shutter speed between 1/30 to 1/8 (adjust the object motion, it needs a lot of trial)  
    4. Find a moving object that will be used as photo panning (suggestion: find a background color - colors that blur the background more aesthetically appealing)  
    5. Do not use a tripod, because the camera must glide to the rhythm of the movement of moving objects 
    6. point the camera at the object, camera movement as gently as possible to follow the movement of an object, push the release button halfway to lock the focus  
    7. when our hands are already moving sirama with objects, push the release button fully to take the exposure 
    8. repeat for other moving objects in order to take our hands are getting trained in moving the camera.
    JOGJA Cornering
    Panning foto Exposure Time 1/50, Iso speed 100, F/5
    location: std Maguwoharjo, Sleman, Yogyakarta


         okay good luck :)

      Tuesday, October 14, 2014

      Tamron Lens 18-270mm f/3.5-6.3 PZD VC Macro

      Tamron 18-270mm f/3.5-6.3 PZD VC Macro "sapujagat lens"

      This lens is a lens with the farthest reach of the lens compared to the above. Image quality is quite good of 18-135mm after it declined somewhat, especially at the ends, ie 200-270mm. This lens deserves an option if you want to have very far-reaching lens, such as photos of wildlife (wildlife). Kekuranganya (like Tamron lenses in general) lies in the performance of auto focus is a bit noisy and often fail to lock the subject. to get the lens "SAPUJAGAT" You need to prepare the money of Rp 4 million.

      Sunday, October 12, 2014

      Lens Nikon18-200mm f / 3.5-5.6 VR version II Lens

      Nikon18-200mm  f / 3.5-5.6 VR version II "sapujagat lens"

      if you use Nikon cameras, the lens is arguably the best in terms of image quality and body design. The resulting image quality of this lens is very good and sharp in 18-70mm, after that the quality will decline, especially in focal length 135-200mm. In addition, the price is relatively expensive and may be more expensive than your camera. you can buy this camera with a dowry of about Rp 9 million. but the auto focus performance of this lens is very able in the count. This lens is a lens "SAPUJAGAT" One recommendation writers.

      Lens Canon 18-200mm f/3.5-5.6 IS

      Canon 18-200mm f/3.5-5.6 IS "sapujagat lens"
      Image quality shots this lens may not be as sharp as the Nikon lens IN 18-70mm, but overall, the results are more consistent shots this lens from Nikon, especially for long-distance photo (tele). The price is also much cheaper. Unfortunately this lens auto focus is still using the old technology, so there is less noise and focus quickly. For users of Canon cameras, this lens is a lens "SAPUJAGAT" best option at a price of about USD 7.8 million you can carry this lens.

      Sapujagat lens

      Sapujagat Lens

      each lens has its own advantages and disadvantages of each, depending on the specialty, there is a special for photographing small objects or creatures (macro lens), there are to photograph the view (wide lens), for photographing models (fixed lens / prime) and others all no specialization, but those of you who like to travel far and feel lazy or bothered to bring and change the dressing of various types of lenses there is an alternative lens that you should have. lens "SAPUJAGAT" yes as the name suggests this lens has a lot of functions. This lens has a wide focal range, from wide to long (telephoto) so for the lazy or afraid of intruding dust causes camera change lenses often choose this lens as a primary lens.

      The following 5 "SAPUJAGAT" most cameras I recommend

      5 EXCESS PRIME / FIX LENS

      FIX EF 50mm f/1.8 II vs FIX EF 40mm f/2.8 STM
      Prime lens or a prime lens is a lens that can not zoom, so we have to back and forth to get a good angle. then to what we wear lenses that complicated like this? Eits do not underestimate this lens, it looks complicated but this lens a lot of advantages compared to other lenses.

      excess fixed / prime lens

      1 Small and Lightweight
      This lens has a relatively smaller size compared to other types of lenses, small size and light weight make it easy to keep it, more freely and not get tired when brought it especially if you often carry a camera for long trips, this lens can be a good option for Match the camera in with you.

      2 Good for beginner photographers
      Because this lens can not zoom, you have to forward - backward to get a good perspective, if you are a new learning photography this lens will train and hone your instincts in making a good angle to photograph.

      3. Have a Large Aperture  
      Most of the fixed lens has a large aperture standard zoom lens compared to, eg, a fixed f / 1.4 and f/1.8 fixed lens f /1.8 may collect 4-8 times more light, or about 2-3 stops, so the lens is quite ideal even if worn in low light room. large openings that allow you to create photos with background blur in low depth of field (Deep Of Field), it is possible to get a cool bokeh.

      4 photo quality
      Almost all of the resulting image is sharper than the fixed lens with a photo taken with a standard zoom lens. in addition it is also more controllable distortion photo.

      5. economical and affordable prices  
      Compared with other types of lenses ex "sapujagat lens", lens fixed lens can be said that most cheap, As of this writing the price of this lens in the Indonesian market range from $ 1 million, both for Canon and Nikon. although cheap but this lens is not cheap.

      Wednesday, October 8, 2014

      Make HDR photos with Adobe Photoshop

      Make HDR photos with Adobe Photoshop, What is HDR photo? Photo HDR (High Dynamic Range) is a simple shooting with a range of tonal detail that is very large. This usually requires at least three file photos of different exposures of the same decision and incorporate them into one. The following How to Make HDR photo.


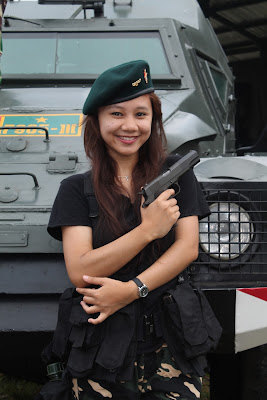
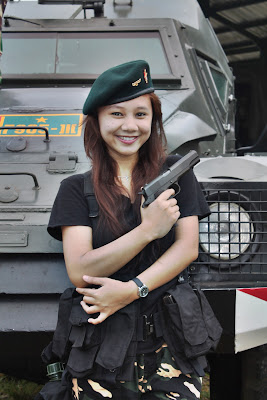
      1. Prepare a minimum of three photos, keep its existing view, can be landscapes, buildings or human in my practice examples that focus only object to humans
      hdr1+ Membuat photo HDR sederhana dengan photoshop
      original image
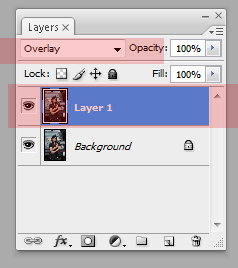
      2. duplicate the original image by (Ctrl + J), change the overlay mode to duplicate the results.
      hdr3 Membuat photo HDR sederhana dengan photoshop
      duplicate image (ctrl+j)
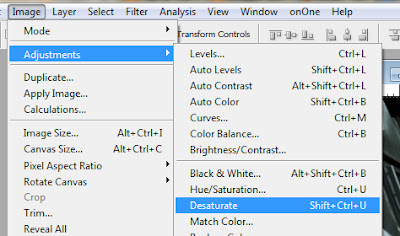
      3.Choose Image> Adjustments> Desaturate
      hdr4 Membuat photo HDR sederhana dengan photoshop
      Image > Adjustments > Desaturate

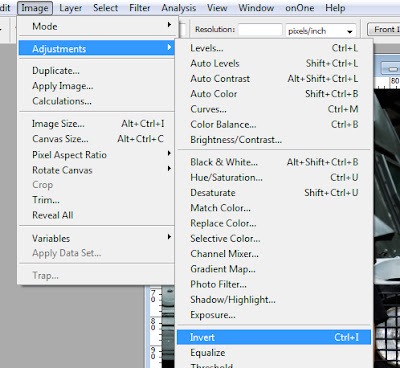
      4. select Image > Adjustments >Invert
      hdr5 Membuat photo HDR sederhana dengan photoshop
      Image > Adjustments >Invert

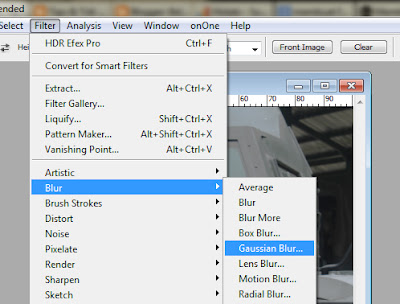
      5.  add Blur effect, Filter-Blur > Gaussian blur

      hdr6 Membuat photo HDR sederhana dengan photoshop
      Filter-Blur > Gaussian blur


      hdr7 Membuat photo HDR sederhana dengan photoshop
      object
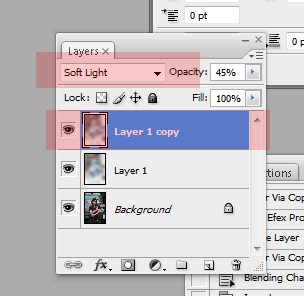
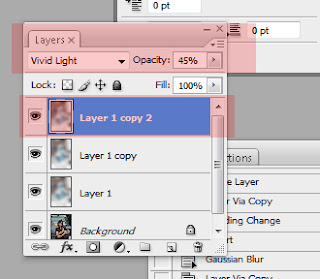
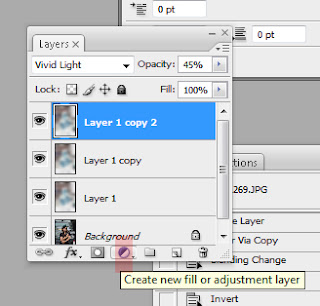
      6. Duplicate Layer 1 (Ctrl + J), change the mode to Soft Light, to get some sharpness, you can duplicate the layer mode while playing over and over, for example by adding a mode to Vivid Light. you should consider in Creating HDR photo is the simplest and fill Opacity setting.
      hdr8 Membuat photo HDR sederhana dengan photoshop
      duplicate layer

      hdr9 Membuat photo HDR sederhana dengan photoshop
      change the mode to Soft Light


      7. For color and lighting problems, you add the Create new fill or adjustment layer for each layer you want. because this will determine the final result of editing.
      hdr10 Membuat photo HDR sederhana dengan photoshop
      create new fill or adjustment layer
      hdr11 Membuat photo HDR sederhana dengan photoshop

      Final Results

      hdr2 Membuat photo HDR sederhana dengan photoshop

      If you want an easier HDR tutorial please go to the plugin, with this plugin topaz you will be easy to create the HDR effect simply a click and point set points to effect dramatic HDR look.okay so the tutorial to Make HDR photos with Adobe Photoshop

      Saturday, September 20, 2014

      Make a color wheel / round color with slow speed technique

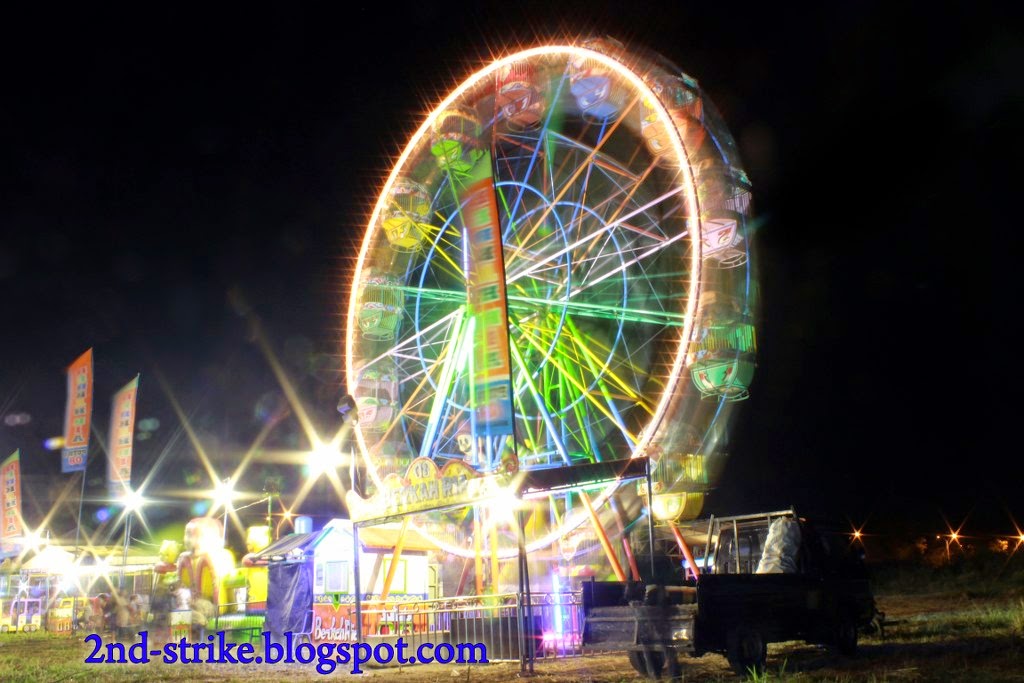
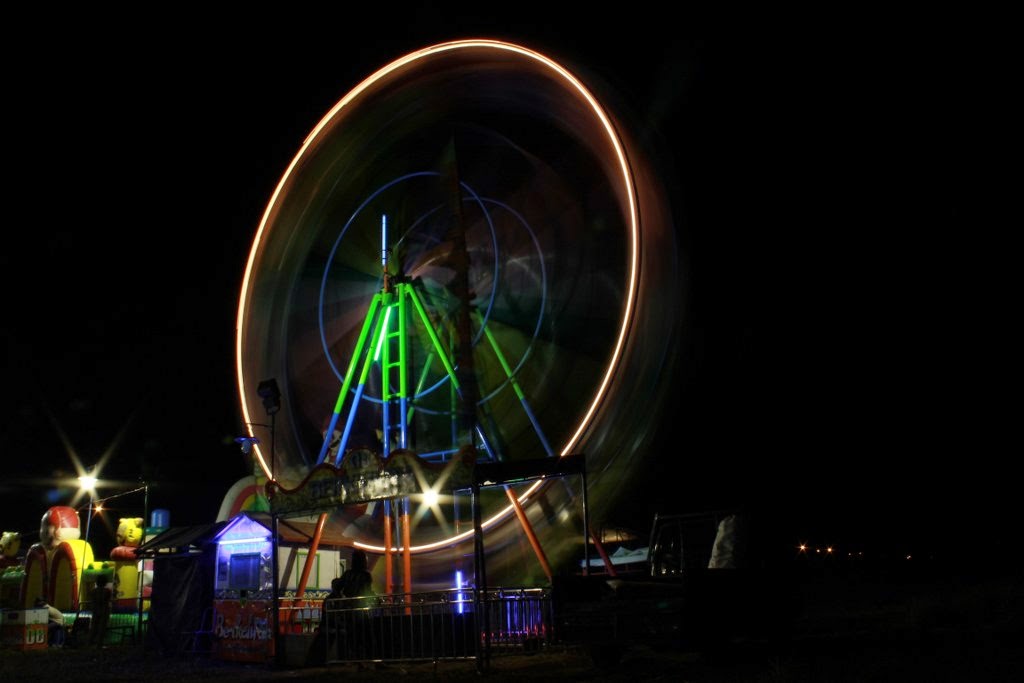
      the exotice of undar kincirangin

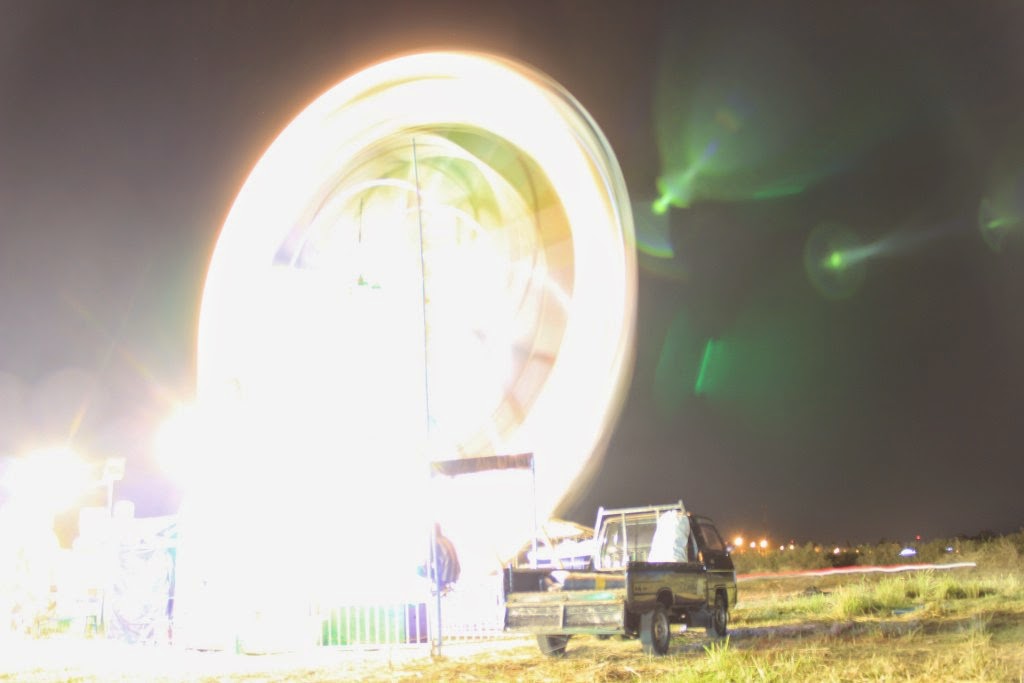
            At the time of the event the night market, or frequent the community of Brebes familiar with the term "bancakan" or "metikan" which is an annual event PG Jatibarang often we see a variety of amusement rides for children - children and adults, such as carousel, barrel devil, Undar ombakbanyu, rainbow / Undar "kincirangin" hefty adrenaline when we ride ... I'm sure you too must have felt the excitement rising Undar not?

      Here we will not discuss the rise kincirangin (Ferris wheel) or ride the waves Undar banyu, we will discuss the technique of slow speed in order to form a round rainbow colors or community EXOTIC Bradford familiar with the term "exotice the color wheel of Undar kincirangin", Yes Undar windmills often we see when the show metikan in Bradford, or in Jogja often encountered when sekaten event. well you know how come back to it again ?. Okay from the run-around - muter immediately wrote back to the topic of how to make "round / exotic color wheel" and what immediately wrote cekidot penampakanya uh check it out!


      Photo by Ari Dwi Yuda Prawira, Loc : Parkir timur Std.Maguwo Harjo, Sleman, Yogyakarta


      f/3.5, exposure time 1 sec, ISO speed 100, Exposure bias +2 step, Kit 18 - 55 mm


        TOOLS


        •      The camera features manual settings (MANDATORY)
        •      Tripod (Mandatory)
        •      Remote shutter (Sunna)
        •      Lens hoods (Sunna)

          The basic principle

          color wheel (kincir warna) is made up of light and color blades - blades rotating Ferris wheel, we should be able to set its shutter speed, exposure, and also harmonious iso speed according to the speed of the Ferris wheel rotation, their end so that the camera can record with the right composition that will produce a good image color wheel.

          Tips on taking the color wheel

            1. Use diaphragm / aperture large
            2. Setting the shutter speed from 1 second to top
            3. Use ISO Speed ​​Low
            4. Turn off auto focus and manual focus search
            5. Find the best angle and try the rare people passing by (this point is quite difficult)
            6. Many try, and do experiments with the play setting shutter speed, aperture, ISO speed, white balance, etc..

              Trial and Error

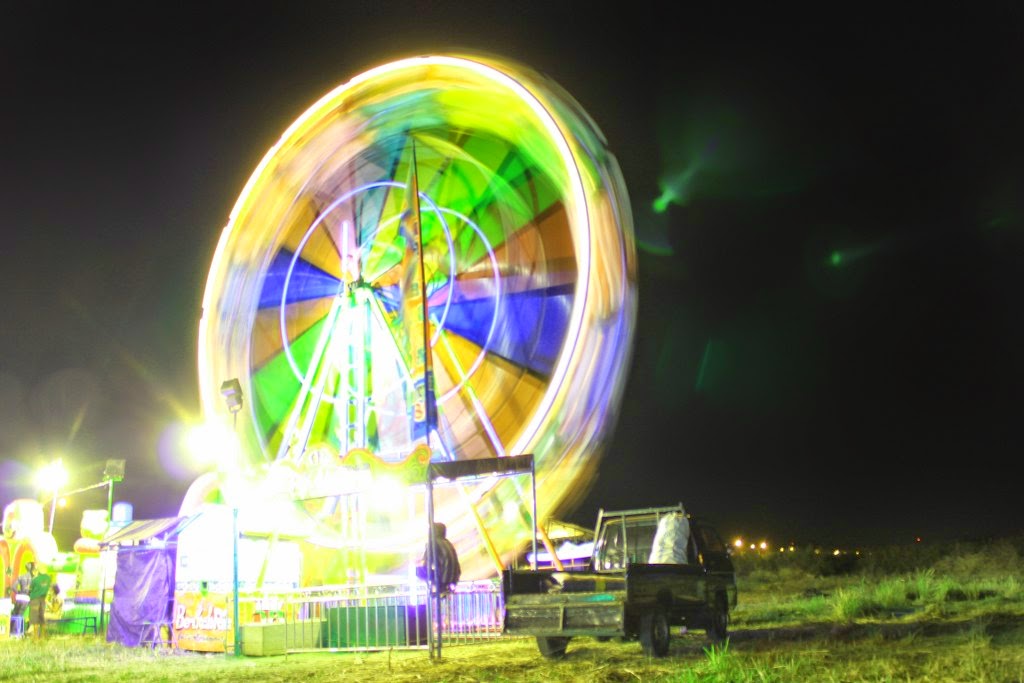
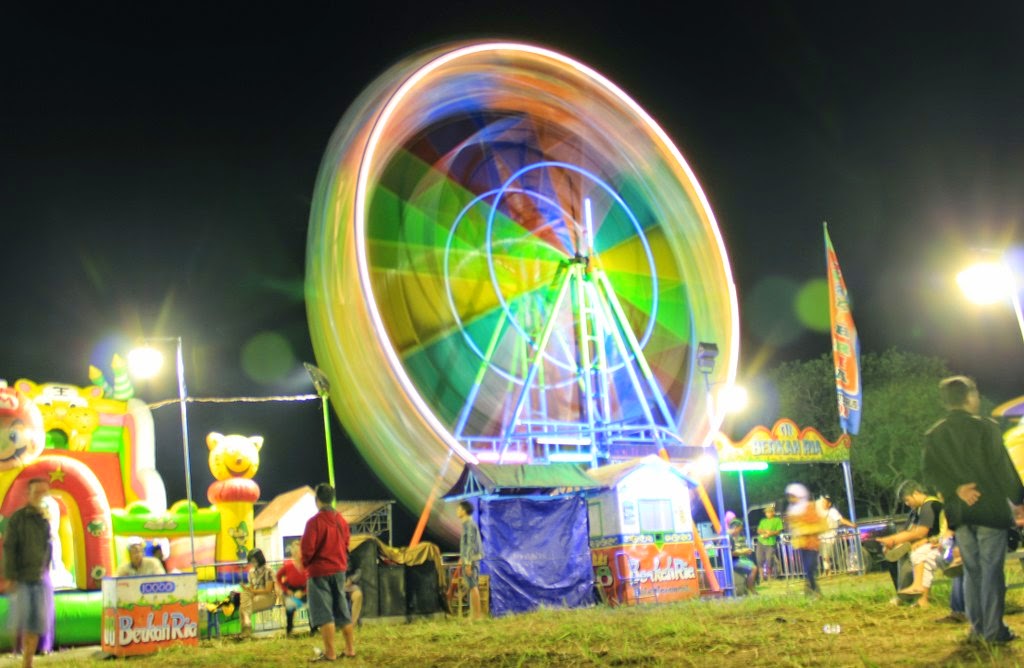
              Trial and error is common in photography especially for beginners who are just learning like me, which is important we keep learning and correction. Here's a photo - photo when I tried to make a photo rainbow color wheel.


              trial and error photos


              over exposure


              under exposure
              Okay so a technique to make a color wheel / color wheel, may be useful for you. good luck and Greetings jeprat - snap !!

              Tuesday, September 16, 2014

              Light Trail Photo Techniques

              Slow Speed Tugu Yogyakarta

              photo light trail are photo techniques with the main object is visible trailing vehicle lights follow the road, photo light trail is quite popular as a form of experimentation for the photography hobbyist. light trail photo techniques included in the category of slow speed or technique often called long exposure technique. In this article I will discuss how to generate light trail photo.

              Foto by ARI DWI YUDA PRAWIRA, 25 detik, f/22, ISO 100, Loc. SEMESTA Cafe
              Jln Abu bakar Ali Kotabaru 2A Yogyakarta

              TOOLS


              For photographing light trails we need a camera with manual control features, where we can set the exposure by changing - change one of the three components of the exposure triangle. You can use a DSLR camera, mirrorless or even a pocket from a pocket camera that offers features that I mean above. What are the extra tools and accessories are required:

              1 Tripod
              2
              Lens Hood
              3
              Remote shutter

              Basic techniques


              In principle, photo light traces generated by cameras record the movement of the light car / motorcycle on the street at night. Due to long exposure duration (a few seconds), then the movement of the lights appear as a line of light down the road.


              Foto by ARI DWI YUDA PRAWIRA, 25 detik, f/22, ISO 100, Loc. K24
              Jln Abu bakar Ali Kotabaru Yogyakarta

              Camera Settings Recommendations

              •   Use the shutter priority mode
              •  Set the shutter speed longer than 6 seconds.  
              • Experiment with shutter speed, adjust until you are satisfied with the appearance of the resulting light trails, as he looked at the photos can vary depending on the speed of passing vehicles. Do not forget, there is still the option to use the bulb mode if you want to experiment further 
              • Turn off the flash !! 
              • Use a low ISO  
              • Turn off the High ISO Noise Reduction feature (or whatever term you on camera), this feature can slow the process camera photo 
              • Consider the composition of your photos. Techniques can be okay, but the composition must be considered. Form of road will greatly affect the shape of the lamp trace. Look for the form or shape of the look angle that looks interesting 
              • For these types of photos like this, use manual focus or set the focus point at the infinity position, use the depth of field is not too narrow


              Advanced Light Trail Tips


              Here are some of the problems that often arise when shooting light trails following solution:

              • Photo traces of light that makes both car / motorcycle disappeared from the photo. If the car / bike is still visible, it means that you are less long exposure. Create a longer shutter speed until the car / motor does not appear anymore 
              •  Equally, if traces of light in your photo dashed. Means setting your shutter speed is still less than the old
              •   If overexposure occurs (the images are too bright), lower aperture value (example: from f / 4 to f / 8). Nor vice versa.

                   Okay, Good luck bro and bra. . and Salam jeprat - Snap !!!